
DESPERATE DEFENCE ON THE SOMME
By the time Bert rejoined the battalion from his leave in the UK, the entire New Zealand Division had at last been relieved from duties in the Ypres salient and was hoping for better fortune in 1918. The new year however would all too soon herald in another crisis, this one on a scale that shook the entire British army and the course of the war.
For now, though, unaware of what lay ahead, the Kiwis were enjoying themselves. On March 10 the men had taken a mix of train and lorries to the rest areas in the villages round Cassel in Northern France for what was intended to be a month’s training and rebuilding the strength of the Division. Burton: “Equipment was scrubbed, brass polished, bayonets rubbed with emery paper until they shone and sparkled in the sun while barrack-square and guard mounting drill formed a not inconsiderable part of the training progamme.”
Even with the relief from the bleakness of Ypres, Bert found the jolt of getting back to army life difficult to adjust to:
“I am just back from Blighty leave and it is hard going back to sleeping on the hard floor again after being between quilts the last fortnight, and it is no joke going back to the army rations.”
He had discovered 1st Auckland billeted in the village of Staple where they spent mornings devoted to training, but, wisely, the NZ officers gave the afternoon over to relaxation and games.
As Burton noted, getting the Division back into shape was important, but not so important as the “marked improvement in morale” that being away from the mud and brutality of Ypres wrought. The New Zealand Division also needed to replenish itself with new drafts of men from New Zealand – but the government by now had found itself forced to turn to compulsory conscription to find enough new soldiers to meet the army’s needs. And some of the old hands who had served since Gallipoli were not enamored to have conscripts joining them, questioning their commitment and ability. Bert comments:
“The main body chaps have a great [dislike for] the reinforcements that are joining us now, the 24ths and 25ths whom they call conscripts, and goodness knows what sort of a hearing the 31sts etc. will get when they join us up.”
Rumours were rife about where the Kiwis may next be sent. In a letter to Nellie, Bert said: “The war is good for another 12 months yet is my opinion. We hear all sorts of rumours, one time we are going to Italy, and the next day it is a sure thing that we are to be sent to Mesopotamia, and then the next day chaps are making bets that we are off to do garrison duty in India, while some fellow has heard from his uncle’s brother-in-law who has a job in the War Office that he heard it straight from the horse’s mouth that the New Zealanders are to be sent to Egypt or Palestine. There is one thing certain that at the rate they are sending reinforcements, they will not be able to keep the NZ forces as a fighting unit.”
On 21 March the Auckland battalion moved to St Omer, which Bert would have remembered from his days practicing for the Messines assault back in May 1917, where a full-size model of Messines and its fortifications had been built. This time the Kiwis were there for shooting practice at a newly constructed rifle range.
And then crisis struck.
Tearing the line

German troops attacking the British line in the 1918 Spring Offensive.
On 21 March 1918 the Germans launched an assault like none other, a final effort to break the stalemate of the trenches and win a decisive victory.
American troops were due to enter the war in large numbers and the German commander Erich Ludendorf (1863-1937) decided he had one last chance to gain an effective advantage. He came up with a plan to split the British in Northern France and Belgium from the French in central and southern France – by attacking with overwhelming force across the old 1916 battle ground of the Somme. He believed if he could break through the lines, the British would pull back north to protect the Channel ports and the French would retreat to cover Paris. He would be able to seize a strategic foothold within the heart of France that would give the Germans a dominant position.
He very nearly succeeded.
The tired British Fifth Army was guarding the Somme sector under command of General Gough, still in disgrace in the eyes of Haig from his failures at Flanders. On 21 March at 4.40am Ludendorf launched what came to be called the Spring Offensive, or Kaiserschlacht, the Kaiser’s Battle, codenamed by the German’s as Operation Michael. It saw the Germans attack on a wide front between the French regional towns of Arras and Amiens. And in the face of this storming assault the Fifth Army collapsed. Left depleted and tired out by the disasters of Ypres, many of the Tommies had nothing left to give. As the Germans battered their way through with division after division of troops and firepower, 70,000 of the British simply surrendered. And as Ludendorf had predicted, the French did indeed wheel to protect Paris - Ludendorf’s long range artillery even managed to lob a few shells into Paris to heighten the French fear.
They were a desperate few days for the British – day after day of reports of retreat. Strategically critical areas, such as the railway junction at Amiens, were at stake. “The hopes of the world hang upon the issue of the gigantic battle now in progress. It becomes increasingly apparent that the German leaders have staked all upon this terrific onslaught,” said the New Zealand Herald of 28 March 1918. As the news came through to New Zealand, newspaper reports tried to emphasis that the British retreat was a wise tactic – allowing the Germans to push on, soaking up the pressure, until the attack ran out of steam and the British could retaliate.
In the end, this is exactly what did happen, but it was not so organised as those reports make it seem and was very nearly a disaster for the British. The scale of the assault Ludendorf unleashed “brought the Allies on the Western Front to the brink of defeat,” in the view of New Zealand historian Glyn Harper.
Gough was indeed putting up a good retreat with what forces he could manage to keep together, but there was no way he could stop the German attack and he had no option but to go ever backwards, scrambling to retain some sort of cohesion in the British defensive line. As whole British divisions collapsed or simply disappeared under the tide of German troops (lost until after the war when survivors were found in German prisoner of war camps to tell of their defeat), gaps began to appear in the British line – gaps with not a single Allied soldier standing between the oncoming Germans and the heartland of France. General Julian Byng, in charge of the British Third Army which had taken over the North around Ypres, was forced to rush troops down to cover the remnants of Gough’s forces, least retreat became wholesale rout.
Nine divisions were plucked from other sectors around Europe and urgently deployed to plug the gaps and stem the German advance, among them three Australian divisions and the New Zealanders. The Kiwis were given three days to get ready to march.
So just five days after Bert had rejoined 3rd Company, he, along with the rest of the New Zealand forces, began moving out, bound for the Somme.
Bert’s diary ends on Saturday 23 March. In his final entries he notes:
March 22: “Rumours about us going into a big stunt. We are in held in readiness to move.”
March 23: “Practising for an attack till 2pm. A very hot day. Issued with iron rations.”
The speed of the action he was involved in from then on probably explains why he lacked time to keep his diary up to date in those last hectic days.
No matter the odds
The Kiwis knew they were heading for the Somme and were aware of the severity of the crisis unfolding. But precisely where they would be pushed into action remained unclear. Glynn Harper writes that the situation was so fluid, the initial success of the German attack so total and sweeping, that the British high command was struggling to keep up with developments on the ground.
The New Zealanders were issued four different sets of orders in just 24 hours about where they were to be deployed. Harper notes it “reflected a degree of panic in the higher levels of the British Expeditionary Force and a lack of clear direction.”
Bert and the rest of the Kiwi Division left St Omer and returned to Cassel where they boarded trains at the rail station on the evening of Sunday 24 March, packed into what were cattle cars. They travelled all night until, mid-morning on Monday March 25, they reached the village of Hangest-sur-Somme where, as Colonel Hugh Stewart in his history of the war described it, the Kiwis were emptied out into “the disorganised stations west of Amiens,” the regional capital of the Somme.
The pressure of the German attack was apparent in the increasing confusion in the surrounding area and immediately the New Zealanders began to encounter logistics issues, trying to go eastwards towards the oncoming German armies, while so many others were fleeing west to get away. From the train head at Hangest the Kiwis started out, with no clear destination yet, but knowing they were heading into the teeth of the storm. 1st Auckland were fortunate to get motor-lorries, other Battalions had to foot it. They all had to abandon their packs, blankets and greatcoats. Instead they were each carrying 220 rounds of ammunition, extra ammo for the Lewis gunners and just three days’ water and food rations. From now on, they would live, sleep and fight in what they had on and survive with what they could carry.

Stewart: “In light fighting order the leading troops had set out briskly towards the front, along dusty roads congested with military transport and with labour units, stragglers and refugees streaming westwards.” This was the first time some New Zealand soldiers had encountered civilians fleeing fighting and entry after entry in Kiwi soldiers’ letters and diaries show how the plight of these families moved the men.
1st Auckland ended up outside the town of Dernancourt 50km away from Hangest, where they bivouacked that Monday night, March 25. By 10pm the overall New Zealand commander General Andrew Russell finally had firm orders of where the Kiwis were needed – a piece of provincial Picardy just north of Dernancourt. He set out immediately himself to establish his divisional headquarters and, reconnoitering the area at 1.30am, decided to set up base in the middle of a field just outside the village of Hedauville. The commanders of the Kiwi brigades requisitioned anything they could use, from cars to horses, and rushed to join Russell.
Those troops who had made it to Dernancourt (others were still struggling to get out from the rail head at Hangest) had been lying where ever they could find space, in their fighting kits. They were roused after just a short chance to sleep and early in the chilly hours before dawn on Tuesday March 26 they began a forced march of a further 15km to the new Divisional HQ. Dawn came, and the troops were still marching. They passed one or two straggling units of Tommies and Scots and near Hedauville saw several of the newly designed Whippet tanks.

This photo is actually of 1st Auckland on March 26 as they are passed by the Whippet Tanks. You can see how the battalion was marching platoon by platoon – there is another platoon just in front of the tanks. The houses of Hedauville can be seen in the distance. Perhaps Bert is amongst those in this photo.
As Ormond Burton described it: “Hour after hour, the steady tramp, tramp, tramp along the high road ate into the tale of kilometres. There was a short spell for a cold breakfast and then once more the steady move forward through a countryside that was curiously deserted. One thing only was certain, and that was that where the marching stopped there the fighting would begin.”
And not just any fighting, for the New Zealanders were being pushed into a pivotal position where a significant gap had opened amongst the retreating British forces near the western bank of the sluggish River Ancre, a tributary of the River Somme, between the French villages of Puisieux and Hamel – a roughly eight kilometre stretch of territory.
The various divisions of the British V Corp which had been holding this part of Picardy had lost touch with IV Corps to the north of them and with each other. Despite orders not to surrender the Ancre, they were falling back independent of each other with no cohesion, retreating over the river. Stewart quotes a message issued by V Corps Headquarters to 63 Division, which was still in place and seemed to be holding its line. The message illustrates just how much pressure the British troops were under: “The 2nd Division is being forced back at Beaumont-Hamel and is practically non-existent. They have been asked to hold the crossings between Hamel and Beaucourt, but GOC [which stands for General Officer Commanding] does not think this will be possible.”
Here then was the point of most danger. The line had been broken. A gap had opened, and it would be a race to see if the Kiwis could plug it and reform the British defensive line before the Germans got through in unstoppable numbers. In Glynn Harper’s view the Kiwis were being thrown into “the most vulnerable and fluid part of the front.”

And German scout patrols had indeed found the gap and were directing their forces to it.
Stewart: “In this gap hostile patrols had already crossed the river.” Under cover of German smoke barrages these advance parties had managed to penetrate as far as the villages of ebuterne and Conlincamps and were reporting back “an absence of British resistance.” It was evident , said Stewart, that: “This ever-widening gap between the V and IV Corps was fraught with menacing possibilities.”
As Burton says: “One thing was clear. The New Zealanders had marched straight into the gap that had developed between the IV and V Corps. Somewhere ahead of them were the enemy, who had found the weak spot and were racing desperately to pass through before it should be closed. If they succeeded, the fall of Amiens and of Doullens would be almost a certainty. At all costs this gap had to be closed and closed without an hour’s delay.”
However, while the Kiwis were the only Allied troops in the area standing between the Germans and victory, they were at less than half strength. Because of the difficulties in getting transport and delays in confirming their ultimate destination, the various battalions of the NZ Division were still strung out along the French roads, all the way back to Hangest-sur-Somme, desperately continuing to march towards General Russel’s impromptu headquarters.
It meant Russell had to make a bold call.
He would commit his troops to the fight piecemeal as they arrived – there was no time to wait for each Brigade’s constituent battalions to get there and assemble into their correct fighting order. Nor was there time for proper reconnaissance to establish where exactly the Germans were or in what numbers. Soldiers would need to be sent forward to take on the Germans wherever and whenever they met.
Russell devised a hasty plan. Mailly-Maillet, a small town of around 600 people immediately ahead of the Kiwis, lay at the heart of this new battle sector. Russell would fan his troops across the fields beyond Mailly-Maillet. It was an area that lay just behind the old British front line from 1916 before the First Battle of the Somme and was riddled in parts with trenches and earthworks. Russell would first deploy an initial force to seize defensible high ground to the south-east of Mailly-Maillet, and then spread patrols out to find and create a firm anchor with British V Corps troops who he fervently hoped were still in position and holding the tiny settlement of Hamel. The Kiwis would then seize the ridgeline overlooking the Ancre River to block any German advance there. Once that right flank was in place, the push north would begin, up to the village of Puisieux where again Russell was relying on V Corps being in place to secure the left flank. If he could pull it off, Russell would close the gap, creating a new defensive line: a line of Kiwi soldiers, which, no matter how desperately thin it may be, would be told to withstand whatever the Germans may batter them with and halt the advance once and for all.

Born in Napier, Andrew Russell was educated in England, including at the Royal Military College, Sandhurst. After serving for five years in India and Burma, he returned to New Zealand and farmed sheep with his uncle.
The first troops to arrive at Russell’s headquarters, at 2am, shortly after Russell had arrived himself, was the 1st battalion of the Rifle Brigade, the Dinks. At dawn, around 6.30am, they were ordered forward.
The Aucklanders were next to arrive. Because the Wellington Battalions, which normally formed 1st Brigade alongside the Aucklanders, were still miles away marching to reach them, there was a rapid reshuffle. The Aucklanders and some companies of the 2nd battalion of the Dinks combined and were formed into an impromptu and much reduced new 1st Brigade. The Canterbury battalions of 2nd Brigade were next to arrive and were likewise hastily formed into a new leaner 2nd Brigade without their normal Otago comrades.
But before he could send these Brigades into the field, news came to Russell of the discovery of German scout patrols in the village of Colincamps, just north of Mailly-Maillet. It placed the Kiwis in danger of being outflanked, so 1st Brigade (the Aucklanders) was held in check, least they were needed to be thrown into Colincamps to clear it.
This meant 2nd Brigade was instead sent forward on its own.
Eventually, by midafternoon, news came that Colincamps had been dealt with – a battery of British artillery had been moved into position and fired into Colincamps, silencing the German machine guns that had been set up. Then 14 of those new Whippet tanks the Aucklanders had encountered during the march went in and cleared the village. With the Aucklanders no longer needing to be held in readiness for Colincamps, they finally went into action.
Stewart notes that after the wastes of Ypres, the fields, the villages and the trees “made Picardy appear a very pleasant country” to the Kiwis. But however green and pleasant it looked, Bert and his fellow Aucklanders knew they were heading into a tough fight once more - just two half-strength Brigades, and the redoubtable lone battalion of Dinks ahead of them as scouts, up against the might of the German advance.
And General Russell knew he was taking a gamble, throwing such a small force into the fray, writing in his diary: “I was not sure that we were not in for a catastrophe.” But the Germans were coming and there was no time to wait, they had to be stopped.
Given that there were effectively three successive waves going into action that day, each with a differing but overlapping objective, it makes for a clearer approach to detail their different experiences one by one.

The first wave of Dinks - the 1st Rifles
It was that lone battalion of Dinks, the 1st Rifles, up ahead of the rest of their fellow Kiwis, who were about to show the Germans that the New Zealanders were indeed going to stand in their way today.
They had been given the task to set up an advance position on the Auchonville Ridge, an important piece of high ground on this side of the River Ancre, and then to send out patrols to find and link up with any units of the British V Corps they could locate on the right of the New Zealand position.
The four companies of the Dinks’ 1st Rifles, supplemented with just two sections of the specialist Lewis Machine Gun Company to bolster their firepower, moved out from the divisional HQ through the gentle, uphill fields south-east of Mailly-Maillet.
They were using one company as an advanced guard, sent scouting forward as a protective screen specifically to make first contact with the enemy. Following them as the main force were two more companies, with the final company following in reserve, to be thrown into action where needed.
The advance company was strung out in a long line, each Dink abreast of each other, moving through open country toward an enemy whose position was unknown. Because they were so stretched out they were spread thin and contact with the Germans was not consistent across their frontline. Some platoons saw no action, others were to bear the brunt of the fighting.
Reaching Auchonvillers, a little hamlet of only 150 people and barely 2km east from Mailly-Maillet, the platoon on the far left flank of the Dinks’ scouting line turned north up the road from Auchonvillers which leads to the village of Hébuterne – the modern D174 - while the rest of the platoons secured Auchonvillers itself and the ridge line, which basically follows the southern stretches of the road.
About 1.5km north of Auchonvillers the D174 meets the road from the village of Serre to Mailly-Maillet – the modern D919 - and near this crossroads stood a sugar refinery, which processed sugar beet grown on the neighbouring farms.
As the D174 approaches the refinery it becomes a ‘sunken road’ – a type of road dating back through the middle ages and probably beyond, that has worn its way down into the landscape so that its sides rise up as banks, and along the immediate edge of the road were ditches, making it a virtual natural trench and a valuable piece of territory for either the Germans or Kiwis, depending who could seize it and hold it.

The map on the left is stitched together from two British Army Ordnance maps from WWI (the sector falls between two map zones) – the top is 57DNE from 20 Oct 1916 and the bottom is 57DSE from 6 Feb 1917. They show the Sugar Refinery cross roads and the part of the D174 called the Sunken Road. The photo on the right is a view of the road in 2018 from the position marked X on the Ordnance map looking south along the dotted line. These days the road’s banks are less pronounced and the hedges considerably thinner.
It was here, in the sunken road south of the refinery, around 11am as they were cautiously edging up the D174, that the leading sections of the Dinks’ left flank platoon ran into the first German troops – coming down the road towards Auchonvillers. Colonel Stewart describes the Germans as “moving forward with entire assurance” and said the Dinks quickly jumped into the open ditches on the side of the road and “hotly engaged him and arrested his progress.”
Burton gives a more colourful rendition of the meeting of Dinks and Germans. He says the Germans were moving swiftly forward, filled with confidence at the British collapse. “The Germans, flushed with victory, had crossed the old battlefield ... they passed the old German front line, they passed the British line of 1916 and in high spirits set foot on what for four years had been inviolate soil. Amiens was before them - Amiens, which would give the supremacy of the world and ‘Deutschland, Deutschland uber alles!’ They were not far from the city of their desire. At any moment, as they topped one of the rolling chalk ridges they might catch a distant glimpse of the spire and belfries of the famous town. For four days their advance had never ceased, and they had met with no serious opposition. Their patrols, advancing boldly, and with no great amount of caution, suddenly encountered the leading sections of the New Zealand Rifle Brigade. There was a shout of alarm, shots and then a moment’s fusillade. The Hun advance guards were driven in and the [Kiwi] riflemen occupied an outpost line in front of Mailly-Maillet to cover the advance of the 1st and 2nd Brigades.”
Corporal Gerald Beattie, 25 at the time, a teacher from Gore in the Otago Battalions which were still marching to get to the Kiwi battle front, wrote later about what he had heard: “The Tommies put up no fight at all against Fritz, but turned and fled, and our Dinks coming up on Monday [Note, he has the day wrong, it is actually Tuesday] when just about 400 yards beyond Mailly-Maillet, met a Battalion of Fritzies marching along in column of route with a band playing, the Dinks spread out and got well sunk into Fritz and he turned round and got chased back a mile or so. Prisoners said the New Zealanders were the first to offer any resistance.”

That first skirmish may have given the Germans a fright, but they were not to be deterred so easily as the Dinks were about to find out. The Germans had by now forded the Ancre in significant numbers further north of where the Kiwis had begun to deploy and were consolidating their forces on the Western bank of the Ancre, their foothold in this area of Picardy. The Dinks could see more Germans heading their way, they estimated two companies, so roughly 400 soldiers, coming south down the D174 towards the refinery, while another group of unknown number was also marching towards the refinery along the D919 from Serre.
By now the two main-force companies of the Dinks had made it through the fields to the Auchonvillers ridge. They took the village unopposed and started consolidating their position. The Company on the right flank sent platoons down the D174, following the instructions of Russel, to find whatever British forces remained on their right flank. That single battalion of Dinks eventually became stretched out over more than five kilometres as they reconnoitered the lie of the land. Their patrols reached the tiny twin village of Mesnil-Martinsart and Martinsart itself even further south, where they found British troops of the 12th still in place and of the 63rd Division, which had been forced back onto the 12ths’ position. One patrol also pushed forward across the fields reaching all the way to Aveluy Wood and the rail line on the bank of the Ancre. On the D73, running from Auchonvillers to Hamel, they found more British troops, these from the 2nd Division – the Division mentioned in the HQ message quoted by Stewart above, the Division that had all but disintegrated. These remnants of 2nd Division were holding positions on the road - but battered and exhausted, these Tommies were in “no condition now to withstand further pressure” according to Stewart.

Two Kiwi soldiers laying down machine gun fire, March 1918.
Meanwhile, back north at the sunken road, the two foremost sections of the Dink platoon with their LMG gunners, who had fired the first vollies to chase off the Germans, now found themselves isolated and fighting for their lives trying to stop the Germans from advancing across the D174 and potentially attacking Mailly-Mallet or Auchonvillers. They were cut off from their comrades, pinned down by enemy fire and confronting a vastly superior force as the main German troops arrived and began occupying the fields on the east side of the D174 from the sugar refinery cross roads down to what was known as Kilometre Lane, which is today a rough single lane road with no name midway down the D174. The area was carved up with a few old trenches from the 1916 Somme frontline.
Around 30 Kiwis were taking on several hundred Germans.
Lieutenant Colonel William Semmens Austin, who wrote the official regimental history for the Rifle Brigade, notes “ugly rushes down the old trenches leading from the strong position in the sunken road became more and more frequent. Shouting ‘give it up Anzac, we are all around you’ the Germans closed in on the left platoon and almost succeeded in cutting it off.” A German commander yelled out with an offer to the Kiwis – surrender and you will be spared and taken prisoner. The doughty Dinks didn’t need to consider. They bluntly refused and stubbornly held their ground, gamely firing everything they could throw at the oncoming enemy – when an LMG gun team went down, a Dink rifleman took over the gun himself. He is credited with killing 90 Germans on his own and his partner, when freed from helping feed ammo into the gun, was firing his rifle as a sniper, picking off another 24 Germans.
This single encounter encapsulated much of the style of fighting the Kiwis were to face here in Picardy, so different from Ypres. Artillery was in small numbers on both sides, instead the main cause of casualties were the machine gun teams, supplemented by rifles used by marksmen acting as snipers to pick off individuals. And while there were many old trenches carved through the countryside, the action was less often that of two sides glaring at each other from heavily defended positions, instead it was dominated by relatively small and highly mobile groups of soldiers establishing temporary strong points and then advancing again or quickly retreating.

A German sniper with a spotter using a telescope.
The Dinks were putting up a lethal resistance. But the Germans kept attacking. The Kiwis who later wrote about this action pay tribute to the Germans facing them, remarking how courageous they were at continuing to attack in wave after wave. Austin: “The fearlessness displayed by the Germans leaders evoked the unbounded admiration of our men. Possibly they were unduly flushed with the victories of the past few days, for they repeatedly dashed forward with what appeared to be the utmost foolhardiness and it was clear that a realisation of the fact that they were now striking at a line practically immoveable had not yet dawned upon their minds.”
However, even given the determined defence of the Dinks, the sheer number of Germans thrown into the attack would inevitably prove too much for the few Kiwi soldiers of the two sections trying to stop them. As Colonel Stewart notes: “Against the German numbers the thin screen could hardly have held its ground.” The Germans, coming down the slope from the north spread across the fields and occupied a piece of high ground called One Tree Hill, which would become a strong point for them through the rest of the day. (The name One Tree Hill overstates the topographic magnitude of this piece of ground. It is not a hill at all, just a mild rise in the landscape, but in this area of gently rolling valleys and rises, any high ground was an advantage.)
The Germans started bringing in their own heavy machines guns, pouring ever increasing firepower into the Dinks. Showing extraordinary courage themselves in the face of such pressure, the Dink troopers managed to skillfully fall back to the main platoon position further down the D174. Then, in the nick of time, the left flank platoon of the main force Dink companies that were now consolidating on the ridgeline came up the road and discovered the firefight their mates were in, providing much needed relief. Soon the rest of the original scouting Company and half the reserve Company hurled themselves into the fray. They even dragged with them some of the exhausted British troops found and rescued by the Dink patrols from the D73, such was the need to strengthen this left flank.
With this renewed force, the Dinks made another strategic pull back, creating a new defensible position pinned to a piece of high ground themselves to match One Tree Hill. They chose a small knoll of apple trees south-west of the refinery crossroads and just to the south of the D919 about 450m down from the junction with the road to Colincamps. The knoll these days has lost the apple trees and instead sports a dense, pocket woodland, but the hedgelines which ran from it in 1918 and provided extra cover for the Dinks are still there.
This flank position stretched in a quarter circle from Apple Tree Knoll back to the outskirts of Auchonvillers.

This top map uses the same British Army Ordnance maps as those in the Sunken Road diagram, but giving a wider view of the surrounding terrain. In the detailed map, bottom left, you can see the topographic lines 150 and 160 which indicate the rising terrain and a single number 161, which indicates this is the peak of the knoll. To the left by road D919 you can see ‘Apple Trees’ marked, indicating the orchard. On the bottom right is a 2018 Google satellite view of the same location, showing the Knoll now covered by a pocket woodland and notably the hedgerows survive from 100 years ago.
Despite the heavy pressure on this flank, the majority of the Dinks were holding their assigned sectors of the ridgeline quietly, with no enemy before them. Yet they could not abandon their positions and go to the help of their mates. So, this cobbled together force of Dink riflemen, LMG gunners and British remnants dug in around Apple Tree Knoll and prepared to soak up the pressure of the German advance - if they could.
It was around 2pm now and whether the Kiwis could indeed manage to hold the line and stall the Germans was very much up in the air. Now more than ever, Russell needed to push his two main Brigades into the attack.
The Canterbury Battalions - 2nd Brigade
The 1st and 2nd Canterbury Battalions and a single LMG company, operating as the slimmed down 2nd Brigade, were by now advancing. They had the objective of pushing through the initial line set by the Dinks on the Auchonviller ridge and cementing a new defensive position closer to the Ancre.
Hamel was the lynch pin for them, here is where British forces were still dug in securely holding their part of the British line and by anchoring the left flank to Hamel the first part of plugging the gap would be secure. From Hamel 2nd Brigade would also occupy the steeply banked ridgeline stretching northwards another 5km up to Beaumont-Hamel, which was lined with old British trenches and would offer a distinct strategic advantage in holding the river.
With 2nd Cant on the left, and 1st Cant on the right flank they successfully passed through the Dinks’ line, pushing the few parties of German scouts in the area before them. It was 1st which therefore reached the area around Hamel, where it came under some sporadic shell fire from German artillery coming from the river valley before them. They occupied the high ground overlooking Hamel and from the ridge above the Ancre valley they could look down onto the Thiepval area which was filled with German forces on the move, though it was clear they had not yet crossed the river at that point – the Kiwis had made it in time to set up a wall of defence on their side of the river bank.

The ruins of Hamel.
Further north, 2nd Cant were having a tougher time. Immediately after passing the Dinks’ advance line, just outside Auchonvillers they came under both artillery and machine gun fire. The Germans may not have crossed the Ancre at Hamel but, as the Dinks had found out, somewhere further north they had done so and were now moving south to where the Kiwis were trying to establish their defensive line.
In fact, by now, the British IV Corps which was meant to be holding Puisieux to the north of the Kiwis, had retreated again. Puisieux was overrun and the British were now putting their hopes of stopping the advance on a new plan of pinning the defensive line in the north to the village of Heburterne.
As they came south, the Germans had set up a strong point at La Signy farm north of the refinery crossroads and then dug in a second strong point at One Tree Hill south of the crossroads. From there the Germans had sent machine gun teams along the ridgeline towards Beaumont-Hamel in an attempt to occupy the pivotal old trenches around the village. The LMG gunners working with the Cantabrians brought their own machine guns into action and they managed to flush the German squads out of the first trench formations they came to on the outskirts of Beaumont-Hamell, but did not make it to the village itself, deciding to dig in and consolidate just short of it. In all, on this flank, they had only managed to push the Dinks’ advance line forward by half a kilometre. But at least they found the old 1916 trenches in reasonably good condition, some with belts of barbed wire still in place which the Kiwis could use to secure themselves from the risk of a more intense German attack.
They also found one more unexpected thing; scattered groups of British soldiers hunkered down in the trenches – stranded remnants of the battered British 2nd Div. Stewart says: “In and about the left of our line were handfuls of very weary troops of all brigades of the 2nd division, about 80 men in all.” The Tommies were mightily glad to see the Kiwis arrive and the Kiwis evacuated them in the evening.
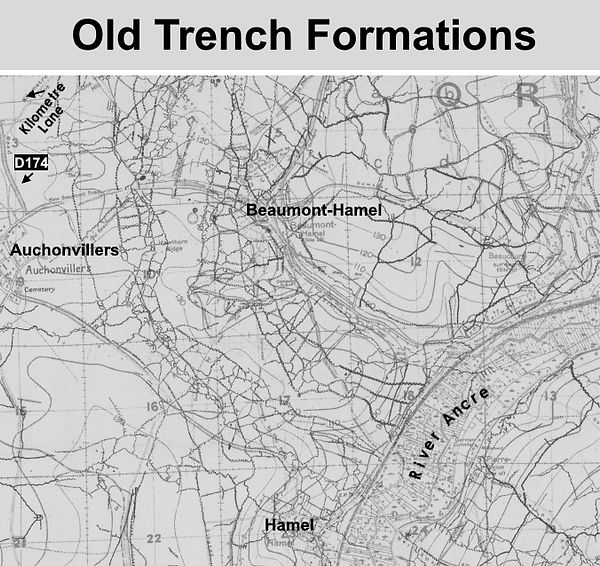
This Ordnance map from February 1917 is difficult to read, but the profusion of lines spidering across it, drawn over the roads and topographic curves, are actually trench formations. The British used aerial photography to make accurate maps of theirs and German trenches which they laid on top of the Ordnance maps. This shows the old trenches the Canterbury troops were fighting to occupy.
Meanwhile that left flank was still a cause of concern. Learning of the hard-pressed Dinks’ around Apple Tree Knoll, the Cantabrians peeled an entire Company off and sent them to assist. This allowed the New Zealanders to extend this troublesome left flank still further. The Canterbury company took over the east of D919, allowing 1st Rifles to cross to the west of the D919 and create a new line of defence.
But the situation was still perilous.
While the Kiwis were now in position to block any further German attempt to cross the Ancre in a line from Beaumont-Hamel to Hamel itself, there was clearly a large German force north of them, somewhere near Puisieux and pouring south putting pressure on the New Zealanders.
Stewart: “On all the featureless terrain of gentle ridge and valley, where little cover other than the old trench systems was available against the German machine guns, the enemy were already in strength well to the west of Serre. They held the road which ran along the high ground from Auchonvillers past the refinery towards Hebuterne and were in force on the crest about the ruins of the large tree-encircled La Signy farm which lay just east of the road, midway between the two villages. Here the Germans had penetrated about a mile into our old 1916 trenches.”
It created the risk that the Germans would push further westward, towards Colincamps, then turn south to outflank the Kiwis and attack them from behind. The success of the whole operation was at risk. At all costs, this left flank needed to be dealt with and the Germans shunted back, or the all-important defensive line would not be created, the link to the British of the 62nd Division IV Corps would not be made, and the gap would remain open for the Germans to burst through.
Action on the left flank was needed, and urgently.
The ruins of Hamel.